| Chamber | Mechanics |
|---|---|
| Chamber 1 | Every 6 attacks, a shadow will appear under the player
After 4 seconds, a boulder will fall at this spot - dealing 150 damage if the player has not moved from the spot |
| Chamber 2 | Boulders continue.
Every 10 seconds, a Vampyre (NPC ID: 106214; 100B HP) will spawn. Only ONE will be able to spawn in at a time. The Vampyre will not attack the player, instead it will mindlessly walk towards Vladamar until it reaches him. If the Vampyre reaches Vladamar, he will heal for 25% HP Players that have unlocked the Sanguineste spell may use this on the Vampyre to instantly kill it |
| Chamber 3 | Boulders continue
Vampyres continue At 25% HP, Vladamar will stop attacking, become untargettable, and begin a defensive stance. He will stay like this for 20 seconds. During that time, the player will need to run around and kill the 3 blood leeches that appear |
| Chamber 4 | If the player is hit by a boulder, then they will be instakilled
Vampyres Continue Blood leeches Continue |
| Chamber 5 | Boulders continue, still instakill
Vampyres will now spawn in as two. Both will use a different overhead prayer Blood leeches Continue |
| Chamber 6 | Boulders continue, still instakill
Vampyres will now spawn in as two. Both will use a different overhead prayer Blood leeches Continue |
| Chamber 7 | Boulders continue, still instakill. Will spawn every 4 attacks now
Vampyres will now spawn in as two. Both will use a different overhead prayer. Will spawn in every 6 seconds now Blood leeches Continue |
| Chamber 8 | Boulders continue, still instakill. Will spawn every 4 attacks now
Vampyres will now spawn in as two. Both will use a different overhead prayer. Will spawn in every 6 seconds now Blood leeches Continue |
| Chamber 9 | Boulders continue, still instakill. Will spawn every 4 attacks now
Vampyres will now spawn in as two. Both will use a different overhead prayer. Will spawn in every 6 seconds now Blood leeches Continue |
| Chamber 10 | Boulders continue, still instakill. Will spawn every 4 attacks now
Vampyres will now spawn in as two. Both will use a different overhead prayer. Will spawn in every 6 seconds now Blood leeches Continue |
Vladamar: Difference between revisions
Jump to navigation
Jump to search
Peripheral (talk | contribs) No edit summary |
Peripheral (talk | contribs) No edit summary |
||
| (6 intermediate revisions by the same user not shown) | |||
| Line 3: | Line 3: | ||
|name = Vladamar | |name = Vladamar | ||
|image = [[File:Vladamar.png]] | |image = [[File:Vladamar.png]] | ||
|level = | |level = 999 | ||
|attack style = Magic | |attack style = Magic | ||
|always drops = [[Platinum Coin]] | |always drops = [[Platinum Coin]] | ||
|examine = It's a Vladamar | |examine = It's a Vladamar | ||
|hitpoints = 500B + 100B per chamber | |hitpoints = 500B + 100B per chamber | ||
|slaylvl = | |slaylvl = 0 | ||
|aggressive = Yes | |aggressive = Yes | ||
|max hit = 100 | |max hit = 100 | ||
| Line 19: | Line 19: | ||
{|class="article-table" style="width: 70%;border: 1px solid black;" | {|class="article-table" style="width: 70%;border: 1px solid black;" | ||
!style="background-color:navy;color:white; text-align:center"| | !style="background-color:navy;color:white; text-align:center"|Vladamar | ||
|- | |- | ||
|style="width: 70%;border: 1px solid black;"| | |style="width: 70%;border: 1px solid black;"| | ||
| Line 123: | Line 123: | ||
Base Reward = | Base Reward = | ||
{{CH}} | {{CH}} | ||
{{CLL| Name= | {{CLL| Name=Congealed Blood | Quantity = 5000}} | ||
{{CLL| Name=Scroll | {{CLL| Name=Diamond Coin| Quantity = 25}} | ||
{{CLL| Name=$250 Custom Credit Scroll (u)| Quantity = 5}} | |||
{{!}}-{{!}} | {{!}}-{{!}} | ||
Prestige 1= | Prestige 1= | ||
{{CH}} | {{CH}} | ||
{{CLL| Name= | {{CLL| Name=Congealed Blood | Quantity = 10000}} | ||
{{CLL| Name=Scroll | {{CLL| Name=Diamond Coin| Quantity = 50}} | ||
{{CLL| Name=$250 Custom Credit Scroll (u)| Quantity = 10}} | |||
{{!}}-{{!}} | {{!}}-{{!}} | ||
Prestige 2= | Prestige 2= | ||
{{CH}} | {{CH}} | ||
{{CLL| Name= | {{CLL| Name=Congealed Blood | Quantity = 20000}} | ||
{{CLL| Name=Scroll | {{CLL| Name=Diamond Coin| Quantity = 100}} | ||
{{CLL| Name=$250 Custom Credit Scroll (u)| Quantity = 20}} | |||
{{!}}-{{!}} | {{!}}-{{!}} | ||
Prestige 3= | Prestige 3= | ||
{{CH}} | {{CH}} | ||
{{CLL| Name= | {{CLL| Name=Congealed Blood | Quantity = 30000}} | ||
{{CLL| Name=Scroll | {{CLL| Name=Diamond Coin| Quantity = 200}} | ||
{{CLL| Name=$250 Custom Credit Scroll (u)| Quantity = 30}} | |||
{{!}}-{{!}} | {{!}}-{{!}} | ||
Prestige 4= | Prestige 4= | ||
{{CH}} | {{CH}} | ||
{{CLL| Name= | {{CLL| Name=Congealed Blood | Quantity = 40000}} | ||
{{CLL| Name=Scroll | {{CLL| Name=Diamond Coin| Quantity = 400}} | ||
{{CLL| Name=$250 Custom Credit Scroll (u)| Quantity = 40}} | |||
{{!}}-{{!}} | {{!}}-{{!}} | ||
Prestige 5= | Prestige 5= | ||
{{CH}} | {{CH}} | ||
{{CLL| Name= | {{CLL| Name=Congealed Blood | Quantity = 50000}} | ||
{{CLL| Name=Scroll | {{CLL| Name=Diamond Coin| Quantity = 800}} | ||
{{CLL| Name=$250 Custom Credit Scroll (u)| Quantity = 50}} | |||
</center> | </center> | ||
| Line 165: | Line 172: | ||
|style="width:70%;border: 1px solid black;"| | |style="width:70%;border: 1px solid black;"| | ||
<center> | <center> | ||
{{DropsTableHead}} | {{DropsTableHead}} | ||
{{DropsLine|Name = Platinum Coin|Quantity = | {{DropsLine|Name = Platinum Coin|Quantity = 500-1500|Rarity = Always}} | ||
{{DropsLine|Name = Treasure Hunter Chest|Quantity = 5|Rarity = Uncommon}} | |||
{{DropsLine|Name = Treasure Hunter Chest Key|Quantity = 5|Rarity = Uncommon}} | |||
{{DropsLine|Name = Treasure Hunter Chest|Quantity = | {{DropsLine|Name = Box of Enchantments|Quantity = 5|Rarity = Uncommon}} | ||
{{DropsLine|Name = Treasure Hunter Chest Key|Quantity = | {{DropsLine|Name = Diamond Coin|Quantity = 1|Rarity = Uncommon}} | ||
{{DropsLine|Name = | {{DropsLine|Name = Diamond Coin|Quantity = 25|Rarity = Uncommon}} | ||
{{DropsLine|Name = Diamond Coin|Quantity = | {{DropsLine|Name = Scroll Crate|Quantity = 10|Rarity = Uncommon}} | ||
{{DropsLine|Name = Diamond Coin|Quantity = 25 | {{DropsLine|Name = Ultimate Fortune Chest|Quantity = 10|Rarity = Uncommon}} | ||
{{DropsLine|Name = Scroll Crate|Quantity = | |||
{{DropsLine|Name = | |||
{{DropsLine|Name = Harmony Key Half (PvM)|Quantity = 1-5|Rarity = Uncommon}} | {{DropsLine|Name = Harmony Key Half (PvM)|Quantity = 1-5|Rarity = Uncommon}} | ||
{{DropsLine|Name = | {{DropsLine|Name = Starfury Mystery Box (Magic)|Quantity = 1|Rarity = Uncommon}} | ||
{{DropsLine|Name = | {{DropsLine|Name = Starfury Mystery Box (Range)|Quantity = 1|Rarity = Uncommon}} | ||
{{DropsLine|Name = | {{DropsLine|Name = Vitality Mystery Box|Quantity = 1|Rarity = Uncommon}} | ||
{{DropsLine|Name = Dream Pet Mystery Box|Quantity = 1|Rarity = Uncommon}} | |||
{{DropsLine|Name = Fallen Warrior Mystery Box|Quantity = 1|Rarity = Uncommon}} | |||
{{DropsLine|Name = Mythic Slayer Mystery Box|Quantity = 1|Rarity = Uncommon}} | |||
{{DropsLine|Name = PVM Resource Bundle|Quantity = 1|Rarity = Uncommon}} | |||
{{DropsLine|Name = Vital Enhancement|Quantity = 1|Rarity = Uncommon}} | |||
{{DropsLine|Name = Shadow Gem Upgrade Token|Quantity = 1|Rarity = Uncommon}} | |||
{{DropsLine|Name = Eternal Enchantment Stone|Quantity = 1-3|Rarity = Uncommon}} | |||
{{DropsLine|Name = Diamond Coin|Quantity = 50|Rarity = Rare}} | {{DropsLine|Name = Diamond Coin|Quantity = 50|Rarity = Rare}} | ||
{{DropsLine|Name = Diamond Coin|Quantity = 100|Rarity = Rare}} | {{DropsLine|Name = Diamond Coin|Quantity = 100|Rarity = Rare}} | ||
{{DropsLine|Name = Diamond Coin|Quantity = 250|Rarity = Rare}} | {{DropsLine|Name = Diamond Coin|Quantity = 250|Rarity = Rare}} | ||
|} | |||
</center> | </center> | ||
|} | |} | ||
Latest revision as of 20:50, 16 September 2025

| |
| Combat Level | 999 |
|---|---|
| Hitpoints | 500B + 100B per chamber |
| Slayer Level | 0 |
| Aggressive | Yes |
| Attack Style | Magic |
| Attack Speed | |
| Max Hit | 100 |
| Weakness | None |
| Always Drops | Platinum Coin |
| Examine | It's a Vladamar |
| Hit Cap | None |
| Vladamar | ||||||||||||||||||||||||||||||||||||||||||||||||||||||||||||||||||||||||||||||||||||||||||||||||||||||||||||||||||||||||||||||||||||||||||||||||||||||||||||||||||||||||||||||||||
|---|---|---|---|---|---|---|---|---|---|---|---|---|---|---|---|---|---|---|---|---|---|---|---|---|---|---|---|---|---|---|---|---|---|---|---|---|---|---|---|---|---|---|---|---|---|---|---|---|---|---|---|---|---|---|---|---|---|---|---|---|---|---|---|---|---|---|---|---|---|---|---|---|---|---|---|---|---|---|---|---|---|---|---|---|---|---|---|---|---|---|---|---|---|---|---|---|---|---|---|---|---|---|---|---|---|---|---|---|---|---|---|---|---|---|---|---|---|---|---|---|---|---|---|---|---|---|---|---|---|---|---|---|---|---|---|---|---|---|---|---|---|---|---|---|---|---|---|---|---|---|---|---|---|---|---|---|---|---|---|---|---|---|---|---|---|---|---|---|---|---|---|---|---|---|---|---|---|---|
|
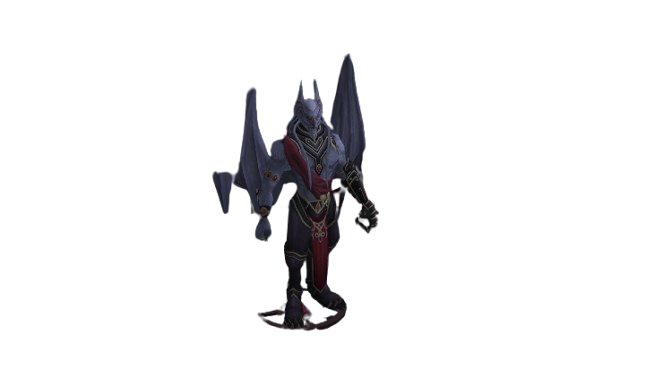
Vladamar is a solo "endless arcade" style boss. You will start at level 1, and work through to level 10. Each level counts as a single kill. Vladamar will gain different mechanics and become stronger during each "Blood Chamber" that the player follows him in to. This will continue up to Chamber 8, with Chamber 9 & 10 only increasing HP and Max Hit.
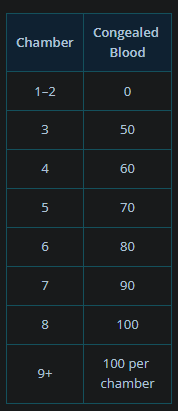
This stacks with your loot and is always safe if you leave via “Take Loot.” Congealed Blood is used in creating most items from Vladamar.
|
||||||||||||||||||||||||||||||||||||||||||||||||||||||||||||||||||||||||||||||||||||||||||||||||||||||||||||||||||||||||||||||||||||||||||||||||||||||||||||||||||||||||||||||||||


